1. Side Project: 1967 Mustang Restoration

    Way back when my wife and I were newly married, we occasionally talked about how neat it would be to fix up her ’67 Mustang — her first car, and the car she owned when we first met.

    While we’ve bought a handful of (far more reliable) vehicles since then, Lisa never would sell the Mustang. It’s kept its place in our garage, mostly just sitting there, withering away. I found it pretty shameful, really, because the Mustang’s previous owners really had taken pretty good care of it earlier in its life. It deserved something better than just rusting away, a minute at a time, year after year, in our garage, its hood and trunk a last-ditch storage place for boxed-up holiday knick-knacks and baby clothes.

    Time to Spend Money; Time to Spend Time

    Over the years, I managed to do a little bit of work here and there on the car — but these were primarily repairs to keep it road-worthy and drivable whenever opportunity presented and/or the urge struck. (We’re talking two or three times a year, tops.)

    But earlier this year, with our Emergency Fund fully funded (and then some), no debt other than the mortgage, and some other cash savings available, we agreed to start in on the restoration of our Pony. Since April, we’ve spent what is, to us, a hefty pile of cash bringing her “first baby” back to respectability. Those of you who wish to follow our trials and tribulations, or just look over my shoulder at some pics, can do so right here:

    New Blog: Our ’67 Mustang

    Yeah, it’s true: I’ll write about pretty much anything. A “car guy” I am not, by any stretch of imagination, but I will admit that’s it been a rewarding task so far. I’ve learned a lot, and had some fun doing what I can to bring the Mustang to life. As of right now, we’ve spent $6,595 on restoration and repairs so far this year, and there’s more waiting in the pipeline. (Which, as my dad so often warns me, is always the case with classic cars. Once you get started down Restoration Road, it never really ends. You can blow precisely as much money as you want … and new wants are always just a broken window regulator away.)

    But hey, with fresh paint and revamped interior, the car now gets looks on the road, and nice comments at the gas station. Neither of which is bad.

    And now, when I come home from work each day and see it there in the garage, I’m no longer ashamed. That, I think, is the best part of it all.


  2. Effective Tax Rate, 2010 Edition

    Each year, once I’ve completed and filed our income taxes, I like to spend a little time calculating my household’s effective tax rate. What’s an “effective tax rate,” you ask?

    Well, it’s a way for me to get outside of the usual “What tax bracket are you in?” thinking that so many folks seem mired in. Yes, income-tax brackets get all the media focus and hubbub, especially when tax rates change, but last time I checked, I pay more taxes than just the “income” variety.

    Since income taxes are really only part of our overall, real-world tax picture — think Medicare taxes, Social Security taxes, property taxes, and so on — it strikes me that figuring a more comprehensive “effective tax rate” gives a much better feel for how much of our money is really going out the door to the Tax Man.

    What’s Included in ETR?

    When I calculate my effective tax rate (“ETR,” for short), I start by figuring out my household’s gross annual income. That includes total wages and salaries (Form W-2, Box 3), interest earnings, non-retirement-account investment income, and any other sideline income that existed for that tax year. Added together, all those items get me the “Gross Income” figure for my formula below.

    On the taxes-paid side of things, I tally up our federal income taxes paid (Form 1040, Line 60), minus any credits below that line — the last two years’ “Making Work Pay” credits would qualify here. Added to that are state income taxes paid (if any), Social Security taxes, Medicare taxes, and any property or local taxes that I forked over during the year. If I have any excise or other taxes that I paid during the year, I lob those in here, too.

    Since I do separate some of my utility-bill taxes in Quicken, those figures go here, as well.

    What About Sales Taxes?

    Yes, to get a true tax picture, the year’s cumulative sales taxes also should get figured in.

    However, tracking sales taxes in Quicken with any sort of precision would mean that most every transaction becomes a split. Whilst I love me some in-depth financial data, I’m just not gung-ho enough to go that far. You gotta draw the line somewhere, right?

    (My annual use taxes do get figured in, though, because they’re included in the amount shown on the tax-form line I use for my Oklahoma “state taxes paid” above.)

    Initially, I planned to omit sales taxes altogether. But as I wrote this, it occurred to me that I could simply fire up an annual cash-flow report in Quicken, export it to Excel, and remove all categories that either (1) aren’t sales-taxable, or (2) already had use tax paid applied. I could take the remaining categories and do a little math on them.

    So I did. Figuring a rough estimate of total sales-taxes paid wasn’t too hard, with exception of auto fuel and its “cents-per-gallon, plus X percent sales tax” setup. Everything else? Pretty simple.

    For instance, our sales-tax rate on groceries was 8.25 percent, and we spent $5,332 on groceries last year, taxes and all. We can estimate that $406 of this was due to sales tax. [5332 − (5332 / 1.0825) = 406]

    Once I dumped that Quicken report into Excel, and autofilled the correct formulas, the sales-tax math was a breeze.

    (Yeah, over time, changes in sales-tax rates will complicate this. But again, all I’m looking for is a rough estimate!)

    A Tax Rate That’s “Effective”

    Once all those items are tallied up, the rest is easy:

    And that’s all. Take your [Total Taxes Paid] amount, and divide it by your [Total Gross Income] amount. The rate that results is your Effective Tax Rate.

    Now, I’ve been calculating my effective tax rate for years, though prior to 2010 I focused only on income taxes. Because I’m a dork who finds such comparisons fun, I tried to standardize things a bit this year so that I could go backwards through our tax returns and see how our ETR — now expanded to include all the other taxes we pay — has changed over time.

    2010 Effective Tax Rate: 21.9%

    So, for tax year 2010, roughly 21.9 percent of our income went toward taxes of one kind or another. For 2009, our effective tax rate was 21.5 percent. And back in 2008? A bit higher, at 23.9 percent.

    Summary

    For a while now, I’ve really preferred to think of my tax burden in terms of this overall “effective tax rate,” rather than in terms of federal and state tax-bracket rates … which is what so many people do. Income taxes are only part of the picture, after all. Until you look at your tax burden in total, taking into account all the directions from which the Tax Man gets into your wallet, then it’s pretty easy to miss the immense impact that taxes have on your total financial picture.

    As the figures above show, I might be in the 15 percent federal tax bracket … but that sure doesn’t mean I’m handing a mere 15 percent of my income to the tax authorities!


  3. Excel: Keyboard Shortcut to End of Column

    A purchaser of my Check Register spreadsheet recently emailed me, asking if there was a quick way to get to the bottom of her register — to get to the first blank row, in other words, in order to quickly add a new transaction. When you have five hundred transactions in your register, scrolling all the way to the bottom of your data so you can enter a new transaction … well, it just ain’t a lot of fun.

    Now, Excel has always had lots of keyboard shortcuts. The one that’s most applicable here would be the [CNTRL]-[DOWN ARROW], or [CNTRL]-↓, shortcut.

    Getting to the Bottom of It

    When I press the [CNTRL]-↓ combination, Excel will automatically take me down to the last nonblank cell in my current, active column. So, in the case of my Check Register spreadsheet, placing Excel’s cursor in any cell in the DATE column (Column C), and then pressing [CNTRL]-↓, will take me to the last nonblank cell in that column.

    From there, a single arrow-down keypress gets us to the next blank row, and we’re ready to enter the new transaction. No scrolling involved!

    (Conversely, pressing [CNTRL]-↑ would take you to the topmost nonblank cell in your current column.)


  4. Handling Paypal Refunds in Quickbooks

    Back in January, I wrote a post about how I handle Paypal transactions in Quickbooks. A reader inquired as to how I handle Paypal refunds in Quickbooks, so here’s a quick run-through. Grab some popcorn, kids.

    Quickbooks And Credit Memos

    Since Quickbooks won’t allow us to record a negative-amount sales receipt or invoice, we have to create a Credit Memo when we need to issue a refund.

    For the purposes of this lesson, let’s assume I need to refund in full the sales receipt (pdf) I showed in my previous post. On it, customer Mary McDoodle bought a $9.95 Kafluder valve, purchased via Paypal. Accounting-wise, I absorbed the 59-cent Paypal fee inside the same receipt, setting it up as an “Other Charge” in Quickbooks. This way, the total of the sales receipt reflected exactly what I saw when I looked at the transaction in my Paypal account; i.e., a net income of $9.36:

    Paypal Register Before Refund

    Now I need to refund Ms. McDoodle. Here’s how it’s done.

    Step 1: Set Up a Credit Memo

    On my Quickbooks desktop, I’ll click the “Refunds & Credits” icon. (You could also get to this by clicking CUSTOMERS in the menubar, and then selecting CREATE CREDIT MEMOS/REFUNDS from the dropdown menu.)

    This opens up a new Credit Memo form. It’ll look much like any other sales-receipt or invoice form you might see in Quickbooks.

    Once the Credit Memo form is open, fill it out so that it matches the receipt or invoice you’re refunding. In other words, enter the same items, in the same quantities, at the same prices. This includes the Paypal fee “Other Charge” item, if you’re entering them inside each receipt the way I do.

    Let’s take a quick look back at how I entered Ms. McDoodle’s initial sales receipt:

    McDoodle Sales Receipt

    And its accompanying Transaction Journal:


    Now for the Credit Memo. Here’s how it will look:

    McDoodle Credit Memo

    Note that I entered the same Items, quantities, and amounts in the Credit Memo as I did in the sales receipt. The Paypal fee is there because Paypal refunds it to me (the seller) when I process the refund in Paypal’s system, which I’ll do manually, outside of Quickbooks.

    When I save the Memo, Quickbook basically “reverses” what’s on it. At least, that’s how I think of it!

    Step 2: Apply the Credit Memo

    So we’ve created Ms. McDoodle’s Credit Memo. Note that nowhere in the Credit Memo form does Quickbooks ask us for the posting account (as it does in sales receipts). That’s because we could do different things with Credit Memos; we could:

    • Allow the customer to “retain” the available credit for later use;
    • Give a refund; or
    • Apply the credit to an invoice.

    When we save/close the Memo, Quickbooks automatically asks which of these options we want to perform. In our case, since we’re refunding the customer via our Paypal account, we’re going to opt to give a refund:

    QB Dialog: Credit Memo Action

    After that, Quickbooks’ “Issue a Refund” window appears:

    QB Dialog: Issue a Refund

    And right there is where we’ll select the account for the refund to come from — which is our Paypal account. One more click of the OK button, and the refund is posted. My Paypal account register shows:

    Paypal Register Shows Refund

    And that’s it — we’re all done with posting the Paypal refund in Quickbooks!


  5. Software Test-Drive: GnuCash

    One of the more popular open-source (and thus free!) finance programs out there today is GnuCash. I’m a Quicken guy, and have been for a long time. While I’ve gotten quite a few emails from GnuCash users over the years, I’ve never really taken a look at it. This is an oversight on my part, as I think it’s important to keep up with the more viable Quicken alternatives out there.

    Well, I recently downloaded and installed GnuCash, just so I could give it a whirl. Maybe see how it stacks up. (I’m not about to leave Quicken, mind you. Though if I were, at this point, it’d be for YNAB3 [my review]).

    What follows is my quick test-drive of GnuCash. Please note that this isn’t meant to be an extensive, nuts-and-bolts-and-oil-leaks review of the software. Instead, I’m just looking to get a feel for GnuCash — see who it’s meant for, what sort of users it accomodates, how it looks and operates, and so on. I’ll slap up some screenshots, punch in some test transactions, and see what happens!

    • Software Used: GnuCash 2.4.0
    • Price: Free / Open Source
    • OS Used: Win7 Professional / 64bit

    GnuCash: The Basics

    As mentioned above, GnuCash is free, open-source financial-management software. The GnuCash website is simple, with very much an “open-source software” feel. The GnuCash developers present their software as:

    Designed to be easy to use, yet powerful and flexible, GnuCash allows you to track bank accounts, stocks, income and expenses. As quick and intuitive to use as a checkbook register, it is based on professional accounting principles to ensure balanced books and accurate reports.

    First point: GnuCash is NOTHING like Quicken. This isn’t necessarily a bad thing; rather, it’s more about what you, as user and money-tracker, need your software to do.

    For starters, unlike Quicken, GnuCash is based upon double-entry accounting standards. In fact, GnuCash resembles Quickbooks much more than it does Quicken. What are called “categories” in Quicken are called “accounts” in GnuCash, just as they are in Quickbooks and most other business-geared accounting programs. GnuCash allows for sales-tax tables, as well as customer and vendor setups and invoice entry — none of which applies to household use whatsoever.

    Basic Desktop

    GnuCash’s homepage tells us that their software can be used for both personal and business financial management tasks. Now, when I see this particular claim, I’m immediately skeptical. Years of dealing with web readers and spreadsheet customers has made me very aware of the super-wide range of expectations (and, of course, computer-operating abilities) of personal- and business-software users. (Yes, I’ve dealt with personal-finance users who would likely excel with business accounting software, if asked. There are also business-software users who can’t get the right answer from a Windows 7 calculator without extensive hand-holding.)

    GnuCash Fits Your Average Home User? No.

    Within thirty minutes of initial install, and a cursory glance of the Help Files, I could tell that GnuCash was a no-go for your Average Home Financial User. When your Help Files, under the heading “Credit Cards,” tell you this …

    To begin managing your credit cards in GnuCash, you should set up a “Liability” top level account and under this parent account create credit card type accounts for each credit card you use. If you are tracking only the payments you make to the credit card company, then all you need is a bank account and a credit card account to enter your transactions.

    … then right away you know it’s Game Over for Joe Sixpack and GnuCash. Create a “Liability” top-level account? Yes, I’m fully versed in such accounting concepts, but I’m a money and software dork. Joe isn’t. For Joe, “liability” is whether or not you can convince your boss that it wasn’t you who broke the expensive GlassVac 9000 the store just bought.

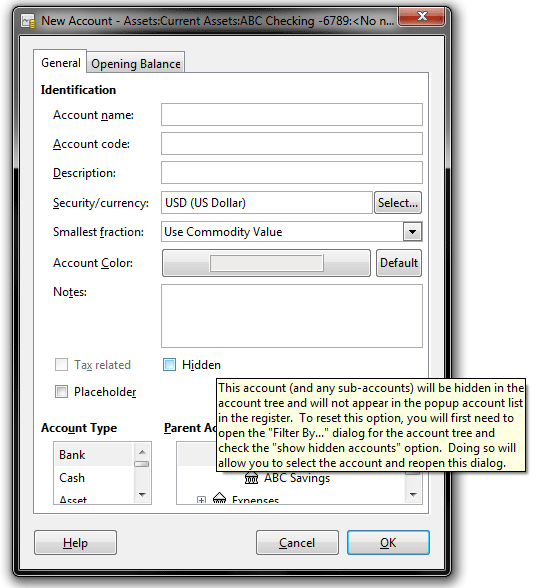
    And it isn’t just that. When you hide accounts in GnuCash, figuring out how to unhide them isn’t easy. Sure, once you know how, it’s no big deal. But I couldn’t find anything in the Help Files that covered this, and I only stumbled upon the answer by following the “Open New Account” procedure and hovering over the “Hidden Account” checkbox. (Searching for “unhide” gave me nothing workable at all, and “hidden” gave me WAY too much to have to sort through.)

    Unhiding a hidden account...

    At this point, if I’m Joe Sixpack, I’m already done with GnuCash, and that’s even before I ask “Why does it show me ‘Profits’ at the bottom? And why do my expenses not affect my equity?” (Which may be precisely what its developers want. If that’s the case, well, I can relate. Sort of.)

    Bottom line: You’ll need at least a basic accounting knowledge to efficiently utilize GnuCash.

    Extensive Help Files…

    GnuCash has very extensive Help Files, and overall they’re very well written. Their explanation (pdf) of double-entry accounting, for example, is succint and gets the concept across nicely. I’d almost like to print it out and give it to some coworkers — it’s that good.

    Unfortunately, the fact that GnuCash’s Help Files are so extensive is also a drawback. Why? Because you’ll need them. I’m just being honest here. There’s a lot about GnuCash that ought to be self-explanatory, but isn’t. I’ve had my share of experience with financial software, certainly, and if I were going to use GnuCash seriously, I don’t see any way around spending several hours reading through the Help documentation.

    Layouts, Usage, and Such

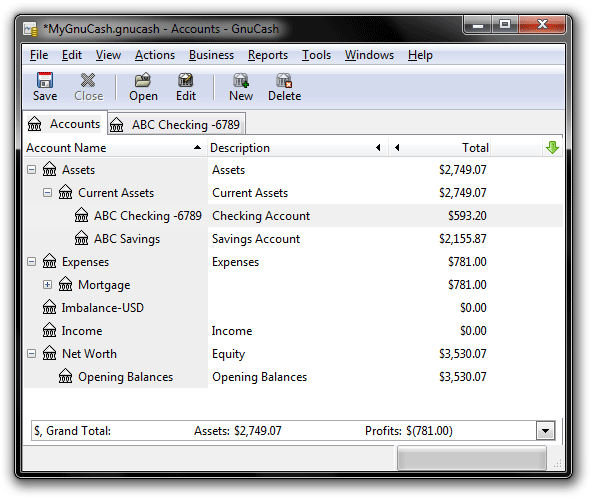
    I’ve really come to appreciate a nice-looking and easy-to-use account register over the years. In GnuCash, every account has a register, which appears thusly:

    Register View

    Looks pretty decent, especially when compared to the desktop — which won’t win any awards for aesthetics.

    GnuCash Users enter transactions straight into the registers themselves, as opposed to doing this in a new window, which is what’s required with AceMoney (review) and many other programs.

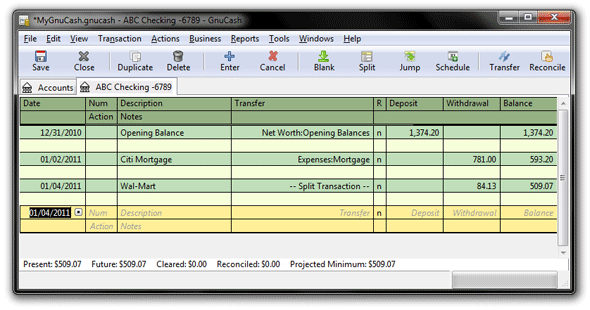
    Split transactions are workable, but feel bulky. If you’re used to the way they’re done in Quicken, then split transactions in GnuCash will make your head hurt. Here’s a Wal-Mart expense split two ways; the register “folds out” to allow you to enter the split accounts…

    Split Trans. in Action

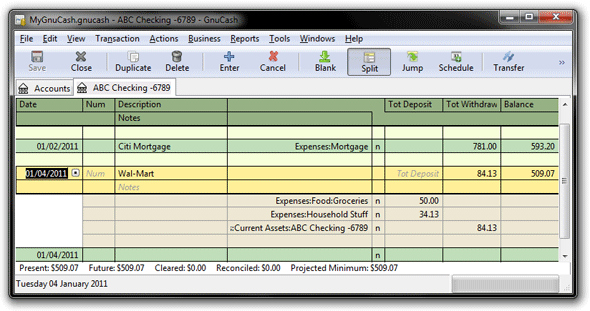
    … and then “folds in” when you leave the split.

    One feature I like: It’s possible to have more than one account open at a time, as each account you double-click opens up in a new tab (much as internet browsers open new tabs for additional “windows” of web viewing).

    GnuCash Reports

    With only a few transactions logged, I fired up a Cash Flow Report in GnuCash:

    Cash Flow Report

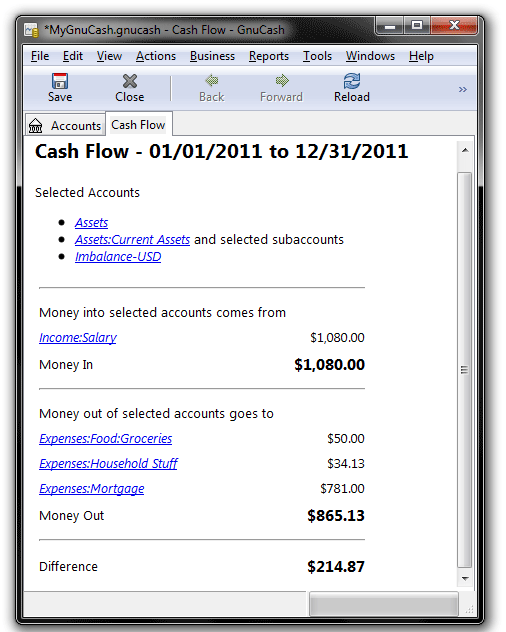
    Looks fine to me. Not great, but fine. Clicking the blue hyperlinked accounts (the equivalent of Quicken “categories”) takes you back to that account’s register for detail viewing.

    Overall Impressions

    Because it’s geared to handle the needs of both business and household finances, GnuCash tries to be a lot of things. It’s this very complexity that makes it, in my opinion, a fairly weak choice for those folks looking to a simple way to keep tabs on personal finances. Users will need to invest a sizeable chunk of time reading GnuCash’s documentation files just to get a decent handle on how it operates.

    The caveat here, obviously, is that I’m used to using Quicken for my personal stuff, and Quickbooks for my business needs. GnuCash seems far too complex to hold up as a competitor to Quicken, and yet not robust enough to measure against Quickbooks. I know that GnuCash has lots of devoted fans, because I’ve heard from some of them. More than once I’ve been told that I’m crazy, just short of certifiable, to be using Quicken when GnuCash is out there, available for free.

    Look: If I’m supposed to bow down to the fact that GnuCash is open-source, well, sorry, I don’t, really. I’m not an expert software developer. I’ll pay money for software that does what I want, easily, the way I want, and gives me more than I expect. I get that from Quicken, and I don’t feel bad about it. It’s why I’ll pay hundreds of bucks for MS Office every few years, and am happy to do it, rather than scrap away at OpenOffice as the “free” open-source alternative (which, I should add, looks like crap, and fairly often, operates like crap, too).

    Newsflash: Free is useless if the product can’t do what you need it to do.

    Could GnuCash do what I need it to do? From what I’ve seen, no. Not on the household level — at least, not easily — and not on the business level, either. GnuCash deserves a place on my list of Quicken alternatives, but after working with it for a bit, it just makes me appreciate Quicken (and Quickbooks) a little bit more.


  6. Handling Paypal Fees in Quickbooks

    How should I handle Paypal fees in Quickbooks?

    Boy, do I see that question appear a lot in my Intuit message-board travels! As a guy who’s been doing the web-biz thing for several years, I can tell you that — sit down for this — Paypal fees are really pretty easy to handle in Quickbooks. They can also be treated several different ways.

    (Readers should note that when I say “Paypal fees,” I consider the term to be interchangeable with Google Checkout fees and pretty much every other online-payment charge out there.)

    See Michael Sell Spreadsheets. See Michael Make Paypal Rich.

    I give away lots of free financial spreadsheets, and I sell a few, too. So Paypal (and Google Checkout!) and I get along pretty well. They allow me to sell stuff to the rest of the net-connected world, and I give them anywhere from sixty cents to a dollar for every product I sell.

    Paypal Fees: Cost of Goods Sold? Or Business Expense?

    ‘Netizens can, and do, argue this for hours on end: Are Paypal fees a “cost of goods sold?” Or are they simply an expense?

    To which I say: Meh, whatever. Either way, the fees get deducted from your small-biz revenue before you get to that place called “net profit.” Whether you classify them as COGS or as an expense, you end up with the same cash in your account.

    But there ARE a couple of scenarios to consider here which would affect how I treat my Paypal fees, accounting-wise.

    Paypal Fees on Products Bought for Resale

    If I, as a business owner, were paying Paypal fees when I bought products for resale, then I would consider those fees to be COGS. I’d account for them as such in Quickbooks, and direct them to a tax line for “Cost of Goods Sold: Other Costs” or something similar.

    Paypal Fees on Products You Sell

    On the other hand, if I as business owner were paying Paypal fees when customers bought product from me — and this is the situation I deal with on a day-to-day basis — then I would be pretty wishy-washy. These fees are realized at the time of sale, on every sale, since Paypal deducts them from my selling price when they deposit the sale revenue into my account. This makes them very much akin to a COGS.

    Despite this, I prefer to account for ALL my Paypal and Google Checkout fees as a business expense. To me, since they’re deducted from sales revenue, Paypal fees are just another form of the “merchant account fees” that brick-and-mortar retailers are so familiar with.

    My Way: Enter Paypal Fees With Each Transaction

    Because I like my Paypal register’s balance (in Quickbooks) to reflect what’s in my Paypal account at any given time, I enter all Paypal fees inside the sales receipt of the sales transactions they accompany.

    Why do I account for Paypal fees inside every sale transaction they affect? It’s because I reconcile my Paypal account the same way I reconcile every other bank or credit-card account, and I want to see each transaction show up in my Quickbooks register the same way it appears on my Paypal screen. For instance, if I sell a spreadsheet for $9.95, it appears as a credit of $9.36 in my Paypal account, with the $.59 fee already deducted.

    Thus, if I can account for the fee deduction on the same sales receipt that contains the sale itself, then my Quickbooks bank register will show the same credit of $9.36. And reconciling is a snap!

    Step 1: Set Up Your Paypal Account As a Bank Account.

    That, at least, is how I treat my Paypal and Checkout accounts. They’re set up as bank accounts, just like my business checking and savings accounts are.

    When money moves either to or from my checking account from Paypal or Google, all it takes is a simple transfer in Quickbooks. (In the QB menubar, BANKING → TRANSFER FUNDS will get it done.)

    Step 2: Create OTHER CHARGE Items for Your Paypal Fees.

    Next you’ll want to set up an Other Charge item (or items, if you want to separate your fees into certain categories, as I do) to represent your Paypal fees. In the Quickbooks menubar, choose LISTS → ITEM LIST. then click the lower-left ITEM button, and choose NEW to get started creating a new Other Charge item. Here’s an example of how mine are set up:

    Because I sell more than one type of spreadsheet — some are my creations, and some are created by others — I have more than one type of Paypal-fee item. This way, I can track how much I’m paying in fees for whichever spreadsheets I select.

    Step 3: Make Your Sales Receipt

    Probably the simplest way to explain this is to show you a sample sales receipt (pdf) that’s similar to what I generate.

    On that receipt, there are two items. The first, a Kafluder valve, is simply the Non-Inventory Item which the customer purchased. The second item is our Other Charge item, created above. It represents the Paypal fee of 59 cents which Paypal deducts from our sale transaction. Note that the Paypal item is entered as a negative, non-taxable amount.

    Alternate Way: Enter Paypal Fees Directly in Your Register

    In my method above, I enter the Paypal fees as an Other Charge item, and I do it inside the receipt which records the sale. Understandably, some folks prefer to have only the sale take place on the receipt. (Perhaps they send a copy of the receipt to the customer, and want it to reflect the total amount the customer actually paid.) These retailers can instead enter the Paypal fee straight into the Quickbooks register for their Paypal account.

    So, for a sample $19.95 sale to customer Joe Shmultzman (great family, the Shmultzmans), the Paypal fee of 88 cents would be entered as a transaction completely separate from the sale, and logged right in the Paypal account register itself:

    The biggest problem with this method, to me, is that you’ll be entering a separate Paypal-fee transaction for every sale you make. That could tally up to a lot of “extra” transactions, if you sell much at all. PLUS you won’t see these transactions listed this way in your Paypal account when you view it online. And that can get a bit disorienting at reconcile time.

    Alternate, Alternate Way: Log Paypal Fees Once Per Month

    I know of some web retailers who log their Paypal fees only once per month. They do this at month’s end, or early the following month, using the Monthly Report which Paypal generates.

    After they run their “Monthly Report” in Paypal, they simply make a register entry for the total amount of fees deducted, expensing it to whatever account they wish.

    Personally, this method would never work for me. I check my actual Paypal balance against my Quickbooks Paypal register balance at least every day or two. When the two don’t match, I’m not a Happy Camper. Tracking fees this way would result in my online Paypal balance matching my Quickbooks Paypal balance ONLY at the end of the month.

    Sorry; no can do. I’d go nuts!


  7. Quickbooks And Web Biz: Three Years Later

    I first talked about using Quickbooks with my web business back in 2007. Now that I’ve used the software for three years, it seems a good time to rehash my thoughts on the subject.

    Quickbooks Can Do a Lot

    If you come to the table with at least some understanding of double-entry accounting, you’ll find that Quickbooks is pretty easy to operate. For the price of, say, $150, Quickbooks Pro is a full-featured offering. Its accounting backbone alone (it can handle bank subaccounts!) is probably worth that price. Add to that the ability to create and customize invoices and receipts and so on, and the hundred-bucks-plus price tag doesn’t phase me a bit.

    I say this even though I customarily upgrade my version of Quickbooks every couple of years. (Quickbooks Pro 2007 was my first QB installation, followed by QB Pro 2009.) Such upgrading every other year is the same process I follow with Quicken, which handles my personal finances.

    But There’s This “Reliability” Thing …

    While my experience with Quicken has, since the mid-1990s, been quite glitch-free, I can’t say the same for my work with Quickbooks. Since I began using it in 2007, I’ve experienced data-file corruption at least twice. In Quickbooks, when your datafile gets corrupted, it is a very bad thing.

    This last occurrence (mid-year 2010) was so severe that I was forced to start from an entirely blank slate, accounting-wise, on January 1 of 2011. This was because I could not backup my datafile (complete with business records from 2007 through 2010) due to the corruption, AND the corruption somehow reached back through all my retained backups. As if that wasn’t bad enough, Quickbooks regularly shut itself down when I’d exit certain menus or lists. When just making it back to Quickbooks’ home desktop becomes an adventure, you know the software has serious limitations.

    And talk about fun: For the last few months of 2010, I was forced to use Quickbooks 2009 Pro on my old Dell laptop, entering records for the remainder of 2010 and using it to complete our 2010 taxes. On my newer Toshiba laptop, I installed Quickbooks 2010 Pro; I began using that on January 1, 2011, carrying over only reconciled ending balances from December 31 of the previous year.

    (I do take some amount of pride in the fact that my QB2009 datafile is so corrupted that Quickbooks 2010 can’t even open it. Nice, huh?)

    In any case, my three-years-and-two-full-data-disasters experience convinces me that Quickbooks is absolutely NOT reliable enough for anything more than the smallest of small-biz endeavors. It also convinces me that keeping a zeroed-out, accounts-and-items-only copy of your Quickbooks datafile — a fresh-start datafile, in other words, with no transactions whatsoever — is an absolute necessity. (Current users of Quickbooks who’ve not experienced such problems should note that it took me one full day, morning to night, to recreate my chart of accounts, item lists, and so on … and that was WITH me having the rare luxury of being able to keep my old company file open on one laptop, while building the new, blank file on another, AND importing from Excel when possible.)

    Where To Go From Here?

    Well, I’ll be using Quickbooks Pro 2010 for the foreseeable future. I’ve given some thought to trying out Sage Peachtree, but my comfort level with Quickbooks just won’t let me steer clear of it … yet. At least I can always make QB do what I want it to do, accounting-wise. Plus, I’ve invested no small amount of time in learning its ins-and-outs and various functionalities. The thought of “going newbie” with an entirely new software set, learning it from the READ-ME file on up, doesn’t enthuse me AT ALL at this moment.

    Down the road, though … who knows? One more encounter with datafile corruption, and I might just head for the Quickbooks exits.


  8. How to Activate Tags in Quicken

    Reader MataDorG left a comment on my latest post discussing tags in Quicken, asking how to make the tag field appear in the Quicken register. Apparently, his/her version of Quicken (2010 Home & Business, in this case) wasn’t showing the tag field at all.

    The “tags” feature is one which can be turned off and on in Quicken. When tags are enabled, the “tag” field should appear appear in the register, like so…

    If that’s not the case, then head up to your Quicken menubar to turn the feature on.

    Activating Tags in Quicken

    In the menubar, select EDIT → PREFERENCES → QUICKEN PREFERENCES. This should bring up a separate window. In the left section of that window, select REGISTER, as shown below.

    Now put a checkmark in the box labeled “Show Tag field.” Finally, click the OK button.

    That should do it. Tags should now be available in your Quicken account registers!


  9. Poll: What Matters When Buying a New Car?

    There’s a new poll out from Rasmussen. Apparently, Americans have become more origin-conscious when it comes to buying new vehicles.

    In a similar poll from 2008, roughly 51 percent of Americans said the most important factor in buying a new automobile was getting the best deal. Today, however, that percentage has dropped:

    Two years ago, only 32 percent of respondents placed more importance on “buying American.” So it appears there’s been something of a mindset-change.

    There’s a snag, however. Just what exactly does “buy American” mean? As the article tells us:

    But Americans are divided on what exactly American-made means. Forty-one percent (41%) believe buying a foreign brand that is built in the U.S. is the same as buying American, but 42% do not. Another 17% are not sure.

    Still, a majority (59%) of adults consider the “Big Three” — Ford, General Motors and Chrysler — to be the only American car companies. Twenty-nine percent (29%) disagree, while 12% are undecided.

    For my part, while my employer is a GM-centric auto group, my household has purchased only Hondas and Nissans in our vehicle-buying history. I was never a big GM fan to begin with, but after seeing everything that’s gone down the last several years, I can safely say that I will never purchase a GM or Chrysler product. (I have no qualms with Ford, though, and might actually consider them if I needed, say, a new full-size truck … though that’s extremely unlikely. Actually, I greatly respect Ford for NOT stepping up to the taxpayer trough when their two counterparts limped into Washington with their hands out. After all, that would’ve given Ford all the cover in the world to get in on the taxpayer action.)

    Obviously, my fellow Americans (1) have very short memories, and (2) have no problem purchasing cars and trucks from companies that have proven themselves to be miserable failures, over and over again, and who have been direct and unrepentant beneficiaries of taxpayer bailouts.

    (And oh yeah — they’re brazen liars, too.)


  10. Quicken: Cash Flow Forecast

    Over the years, Intuit has added lots of tools to Quicken — mostly, I would argue, to encourage its users to adapt an annual upgrade cycle of the software. While I adore Quicken for its performance at tracking accounts, spending, and net worth, I find myself using very few of the additional tools that its Deluxe and Premium versions offer. (As of this post, I’m using Quicken 2010 Deluxe.)

    One such tool — brought to my attention by an email a few months back — is Quicken’s Cash Flow Forecast. It’s meant to help with long-range (say, a year out or more) cashflow planning. Quicken’s Help Files explain it like this:

    For long term forecasting use Quicken’s Cash Flow Forecast feature. A cash flow forecast lets you project your cash flow for the future, based on scheduled bills and deposits and estimated amounts. Quicken can forecast your spending patterns for up to two years, and displays your account balances in a graph.

    You can get to the Cash Flow Forecast via the menubar:

    PLANNING → CASH FLOW FORECAST

    When I select that, Quicken displays a graph like this:

    That awfully smooth, upward-sloping line is meant to show me how my bank-account balances will steadily increase over the next year IF my monthly “Income Items” and “Expense Items” meet the parameters I’ve set up. (Displayed figures above have been certified by the Congressional Budget Office. So you know they’re, uh, reliable.)

    Forecasting: It’s a Lot of Work

    The graph is all fine and dandy, I suppose. However, it took me a patience-testing hour or so to get Quicken’s Cash Flow Forecast set up in a way that’d reflect anything close to reality. Initially, Quicken’s “brain” had taken my next year’s worth of Scheduled Transactions, combined it with my average monthly categorized income and expenses, and applied all of that to my household financial cash flow in a manner that I can only describe as MADDENINGLY RANDOM.

    Some “income items” appeared twice. Many “expense items” appeared three and four times. Now, I’m all for conservative planning, but come on. Those initial figures were a disaster, and way out of whack.

    I can’t imagine that any large chunk of Quicken users would be willing to plow through their incomes and expenses, category by category, Scheduled Transaction by Scheduled Transaction, just to get this thing running at a somewhat realistic clip. I did it, but only because I’m a money dork. The rest of you probably have lives.

    Just Start Over?

    The Cash Flow Forecast allows you to create and save different scenarios, which is probably pretty useful IF you have a few hours to kill. I wasn’t even willing to approach this feature, given what it took just to get the thing set up. (When making changes, income and expense items aren’t even listed in alphabetical order, for crying out loud. Who the hell came up with this?)

    I think that, if I were going to rely on the Cash Flow Forecast at all, I would start by scrapping ALL of the estimated items Quicken creates. I’d then simply enter the categories I wanted, by hand, starting with my largest categories (taxes, food, insurance, etc.) first. I’d likely keep the “Known Items,” as Quicken creates these from Scheduled Transactions, which ought to be fairly ironclad. (Ironclad, that is, IF you’re good about setting up all your recurring transactions as “Scheduled Transactions.”)

    Like a lot of Quicken “tool” offerings, there’s probably some value in the Cash Flow Forecast … but if you’re like me, it might take you so long to rebuild the Forecast data that you simply ignore it altogether.

    Sorry, Intuit. I’m opting instead for dumping a few months’ of Quicken report data into Excel, and working from there!