1. Excel: How to Keep Leading Zeros

    As a guy who uses Excel to open CSV (comma-separated values) files pretty often, I’d like to offer a pro tip:

    Excel will always drop leading zeros in a column of data unless you *import* the CSV file!

    In my Day Job, I often have to work with CSV files which contain job codes which sometimes start with zero — like “08124500” and similar. If I just double-click that file and open it in Excel, well, those leading zeros will always go bye-bye.

    If that’s not what I need (and usually it isn’t), then the only way around it is to open Excel on its own, and then import the CSV file the, uh, slow way.

    (I’m using Excel 2016 currently, but instructions here will be similar for most versions from 2010 and later.)

    1. Open Excel; i.e., a new blank Excel file.
    2. In the Office ribbon, choose the DATA tab.
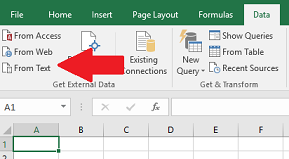
    3. Look for a section of the ribbon named “Get External Data.” Click the “From Text” button.
    4. Button - From Text

    5. A file selection window titled “Import Text File” appears. Navigate that to your CSV file. Click IMPORT.
    6. Excel will walk you through the multi-step file import. The important thing here is Step 3. Click the column with the leading zeros, and set its Data Format as TEXT, rather than GENERAL.
    7. When Excel imports your CSV data, the leading zeros will still be in place!

    So remember: When bringing CSV data into Excel, you have to account for the fact that Excel will always try to figure out what type of data you have — and to Excel, “08253641” sure looks like a number. Which means the leading zero will be dropped. And if Excel guesses wrong, you might have big problems!


  2. Excel: Create Drop-Down Menus

    Thanks to my popular Excel page, I’ve gotten several questions recently about how to create drop-down menus in Excel. Yes, a quick Google search for “Excel drop-down list” or similar would likely educate most folks well enough, but I’ve haven’t posted in a long while … and this seems like a fine little tutorial to add to my collection.

    NOTE: I’m using Excel 2010 for this tutorial. Instructions would be pretty much the same for Excel 2007 and later versions.

    Excel Feature: Data Validation

    The feature in Excel that allows for us to use drop-down menus in cells is called Data Validation.

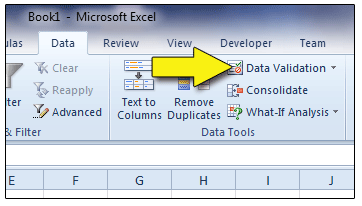
    Data Validation

    In truth, Data Validation allows a spreadsheet creator to control all kinds of things about what the user might enter in cell or group of cells. But when it comes to creating a drop-down list for users to choose from, well, that’s where lots of questions tend to arise.

    So let’s pretend that we have a spreadsheet in which we want our users to enter, in Cell B6, one of four choices:

    • Visa
    • MasterCard
    • American Expresss
    • Discover

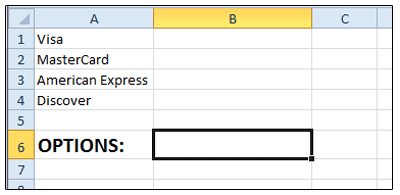
    First, we need to put those options somewhere in our spreadsheet for Excel to find. So I’m going to enter our “list” of options in Cells A1 through A4:

    Data Validation - Create a List

    Note that I don’t have to create my list of options in the same worksheet; it could be in a different worksheet, too, and in any group of consecutive cells you like. The list can also be in hidden rows; that’s what I end up doing most often in my own spreadsheets.

    Now that we have our list, and with Cell B6 as our active cell, we’ll do the not-so-hard part:

    1. In the Excel ribbon, select the DATA tab.
    2. Click the DATA VALIDATION button.
    3. In the SETTINGS tab, find the “Allow:” box, and select “List.”
    4. Now, below that, in the “Source” field, we’ll tell Excel where to find the list of choices we want users to have. In this case, our list is in the area defined by $A$1:$A$4. (The dollar signs tell Excel that these are absolute references to those rows and columns.)

    5. In the “Source:” field, type “=$A$1:$A$4” and then click OK.

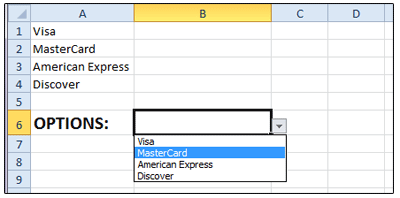
    And just like magic, you’ll see the drop-down menu indicator next to Cell B6. Click that, and our four choices appear in a drop-down menu:

    Data Validation - Drop-Down Menu

    And that, folks, is all it takes to create a drop-down list in any cell (or cells) of your Excel spreadsheets!


  3. 8 Tips for Building a Better Spreadsheet

    Being a financial dork of the highest order, it should go without saying that I love spreadsheets. And I particularly enjoy the process of building good, useful ones.

    Having been a spreadsheet aficionado for many years now, I thought it might be fun to scribble down a few of the “rules of thumb” for spreadsheet creation which I’ve learned over this time.

    (Not only do I make free and for-pay financial spreadsheets for web surfers at large, but my Day Job involves lots of spreadsheet use, too. And many of these spreadsheets get distributed throughout the company, for use by everyone from fresh-faced newbies to blurry-eyed Excel veterans.)

    That said, here are a few of my personal “Rules for Creating Spreadsheets That Don’t Suck.”

    Tip #1: Spreadsheets For You ≠ Spreadsheets You Distribute

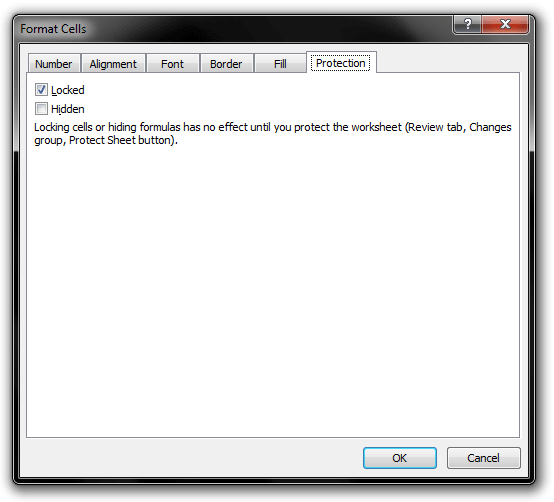
    You might be able to get away with leaving cells unlocked (and the worksheet unprotected) in a spreadsheet you make for your own use, since you as Spreadsheet Creator presumably know what goes where. But that won’t fly with spreadsheets that you distribute for use by others.

    There’s just no telling what someone else will type, nor where they’ll type it. Let’s face it: Stray key-punches are a fact of life. Get a homeless [SPACEBAR] entered into a vital, formula-holding cell, and an entire spreadsheet can detonate.

    And that ain’t good.

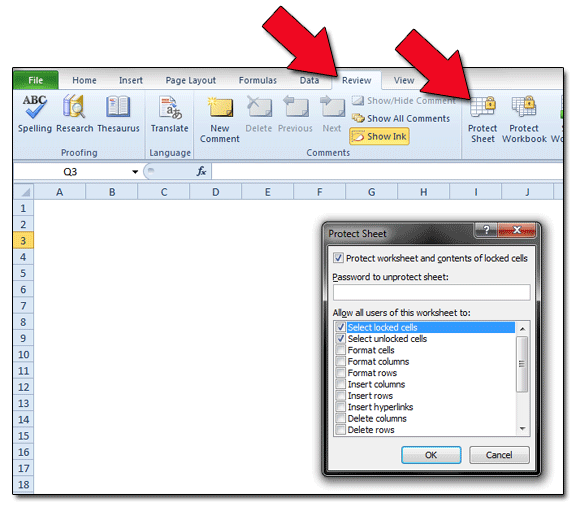
    So be sure to unlock ONLY those cells where users are expected to enter data…

    … and then PROTECT that worksheet!

    Tip #2: Appearance freakin’ matters.

    We’ve all seen them: Spreadsheets emailed to us by coworkers with NO idea of how to arrange and design data in a way that makes sense. Cell text overruns gridlines like snakes dumped on a chessboard; instructions are vague at best; you couldn’t make the page suitable for printing if you taped three sheets of legal paper end to end. What goes where? What’s that army of “#####” symbols in Column G supposed to signify? Should I enter new data in Cell R3, or not? Good luck figuring all this out without going thru every cell by hand … and taking notes.

    Yeah. So, without any sort of cell formatting (read: background colors, borders, and so on) and coherent design to guide us, the actual usability of Coworker’s Latest Creation plummets so fast that it takes an act of God to keep this Excel disaster from being clicked ‘n’ dragged to a Recycle Bin demise.

    In other words, appearance matters. A little cell formatting — often as simple as some understated background colors in those cells where data should be user-entered, with white for everything else — goes a long, long way. The latest versions of Excel provide a metric crap-load of tools to make your spreadsheets look decent. CELL → FORMAT is nothing to be afraid of, you know.

    In other words, the best spreadsheets are a joy to look at, and work with. And the BEST best ones don’t look like spreadsheets at all.

    Tip #3: Gridlines Are Bad. White space is good.

    Plus, it’s easy on your printer. So use it liberally.

    (This includes getting rid of gridlines, and instead manually creating cell borders when necessary. Unused oceans of gridlines are the devil.)

    Tip #4: Color is most effective when used sparingly.

    Remember what I said about using color above? Well, don’t go overboard with that. Personally, I like to color (and unlock!) only those cells where users will need to enter data. All other cells are left white. (And locked!)

    Tip #5: Provide Detailed Labels and Notes…

    Thinking a field is “self-explanatory” courts disaster. You pretty much have to get inside the user’s mind and consider this stuff; you ponder what they’ll be thinking and seeing and deciding. Any guidance you can give that helps get the user’s Datapoint A into the correct cell will pay off big.

    Tip #6: …But Remember That Most People Don’t Read.

    Nobody reads a darn thing anymore. I’m fairly confident that 99% of users start hammering numbers into most spreadsheets without throwing so much as a glance as the “Instructions & Notes” worksheets I almost always provide. But that’s the world we live in.

    Build with the 99% in mind, but put some time into decent worksheet notes, too. Appreciate the 1%.

    Tip #7: Gonna distribute? Use version numbers!

    This is most applicable if you’re building spreadsheets for business use, where more than one person will be using the program. But it can also be helpful if you’re distributing your Excel creations on the internet.

    By applying version numbers to your spreadsheets, you make it easier for users to know which iteration they’re working with. It also makes it a snap to determine if the spreadsheet version that Ron, your nosey coworker in Cubicle B3, is working on is newer and better than yours.

    Tip #8: When possible, place column SUM formulas at the top of the data they tabulate.

    This is kind of a little thing, but man, has it made my spreadsheeting life easier.

    One of the great features of spreadsheets is their ability to analyze ever-changing amounts of data. However, when you build a spreadsheet to account for, say, a column with 100 rows of data which need to be totaled up, you might as well plan on that spreadsheet someday needing to total up 200 rows instead. So to make such a change easier, put your SUM formulas ABOVE the column’s uppermost data cell.

    I know that for myself, it’s almost instinctive to want to total up columns (when that’s what is required) at the bottom of the current data. (Thanks, every math teacher I ever had!)

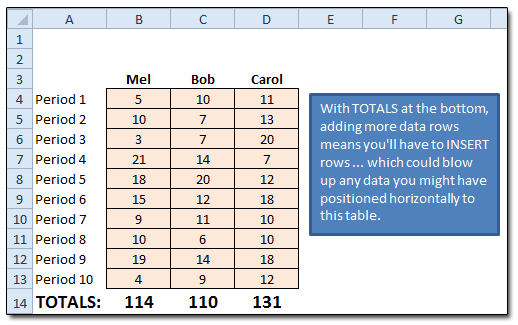
    Here’s an example:

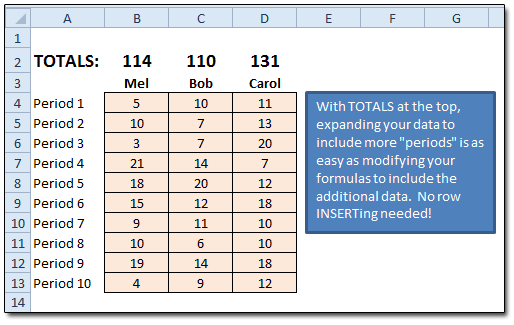
    However, placing the TOTALS (or whatever formula you need) at the top of each column’s data makes it much easier to expand your data “downward” later:

    With formulas at the column tops, you won’t have to go to the trouble of inserting rows (and possibly hosing your formulas) later on, when the need for more data becomes official … as it seemingly always does.


  4. Handling Paypal Refunds in Quickbooks

    Back in January, I wrote a post about how I handle Paypal transactions in Quickbooks. A reader inquired as to how I handle Paypal refunds in Quickbooks, so here’s a quick run-through. Grab some popcorn, kids.

    Quickbooks And Credit Memos

    Since Quickbooks won’t allow us to record a negative-amount sales receipt or invoice, we have to create a Credit Memo when we need to issue a refund.

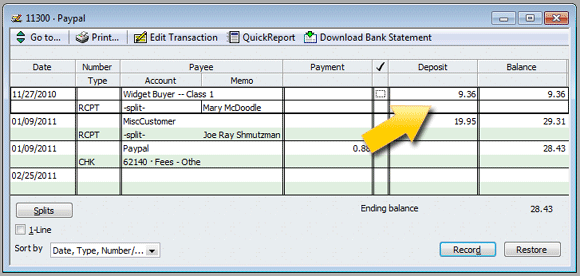
    For the purposes of this lesson, let’s assume I need to refund in full the sales receipt (pdf) I showed in my previous post. On it, customer Mary McDoodle bought a $9.95 Kafluder valve, purchased via Paypal. Accounting-wise, I absorbed the 59-cent Paypal fee inside the same receipt, setting it up as an “Other Charge” in Quickbooks. This way, the total of the sales receipt reflected exactly what I saw when I looked at the transaction in my Paypal account; i.e., a net income of $9.36:

    Paypal Register Before Refund

    Now I need to refund Ms. McDoodle. Here’s how it’s done.

    Step 1: Set Up a Credit Memo

    On my Quickbooks desktop, I’ll click the “Refunds & Credits” icon. (You could also get to this by clicking CUSTOMERS in the menubar, and then selecting CREATE CREDIT MEMOS/REFUNDS from the dropdown menu.)

    This opens up a new Credit Memo form. It’ll look much like any other sales-receipt or invoice form you might see in Quickbooks.

    Once the Credit Memo form is open, fill it out so that it matches the receipt or invoice you’re refunding. In other words, enter the same items, in the same quantities, at the same prices. This includes the Paypal fee “Other Charge” item, if you’re entering them inside each receipt the way I do.

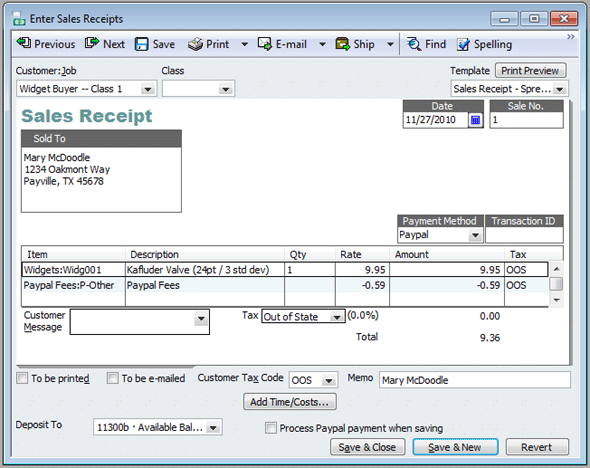
    Let’s take a quick look back at how I entered Ms. McDoodle’s initial sales receipt:

    McDoodle Sales Receipt

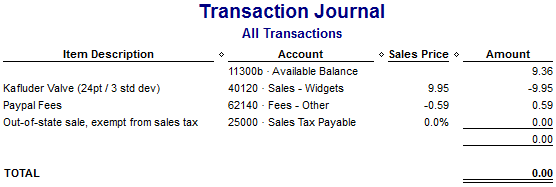
    And its accompanying Transaction Journal:


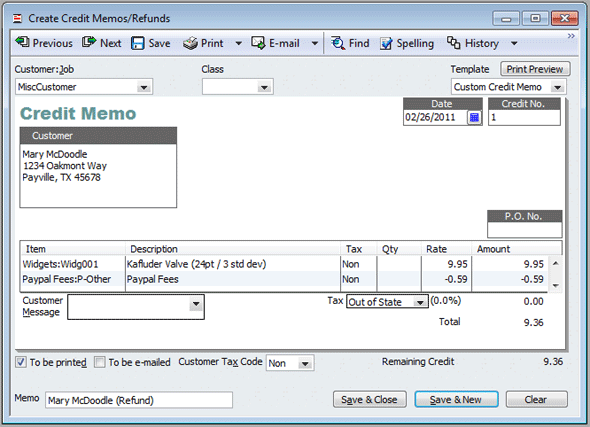
    Now for the Credit Memo. Here’s how it will look:

    McDoodle Credit Memo

    Note that I entered the same Items, quantities, and amounts in the Credit Memo as I did in the sales receipt. The Paypal fee is there because Paypal refunds it to me (the seller) when I process the refund in Paypal’s system, which I’ll do manually, outside of Quickbooks.

    When I save the Memo, Quickbook basically “reverses” what’s on it. At least, that’s how I think of it!

    Step 2: Apply the Credit Memo

    So we’ve created Ms. McDoodle’s Credit Memo. Note that nowhere in the Credit Memo form does Quickbooks ask us for the posting account (as it does in sales receipts). That’s because we could do different things with Credit Memos; we could:

    • Allow the customer to “retain” the available credit for later use;
    • Give a refund; or
    • Apply the credit to an invoice.

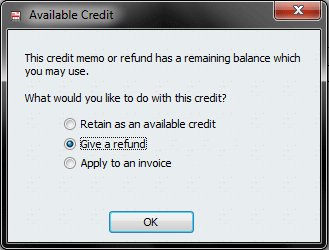
    When we save/close the Memo, Quickbooks automatically asks which of these options we want to perform. In our case, since we’re refunding the customer via our Paypal account, we’re going to opt to give a refund:

    QB Dialog: Credit Memo Action

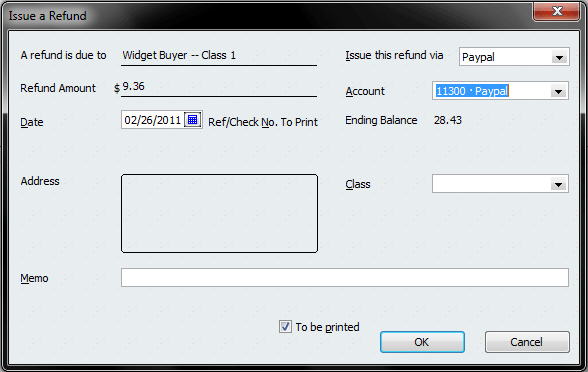
    After that, Quickbooks’ “Issue a Refund” window appears:

    QB Dialog: Issue a Refund

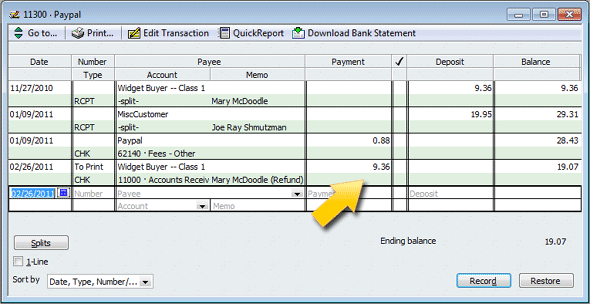
    And right there is where we’ll select the account for the refund to come from — which is our Paypal account. One more click of the OK button, and the refund is posted. My Paypal account register shows:

    Paypal Register Shows Refund

    And that’s it — we’re all done with posting the Paypal refund in Quickbooks!


  5. Handling Paypal Fees in Quickbooks

    How should I handle Paypal fees in Quickbooks?

    Boy, do I see that question appear a lot in my Intuit message-board travels! As a guy who’s been doing the web-biz thing for several years, I can tell you that — sit down for this — Paypal fees are really pretty easy to handle in Quickbooks. They can also be treated several different ways.

    (Readers should note that when I say “Paypal fees,” I consider the term to be interchangeable with Google Checkout fees and pretty much every other online-payment charge out there.)

    See Michael Sell Spreadsheets. See Michael Make Paypal Rich.

    I give away lots of free financial spreadsheets, and I sell a few, too. So Paypal (and Google Checkout!) and I get along pretty well. They allow me to sell stuff to the rest of the net-connected world, and I give them anywhere from sixty cents to a dollar for every product I sell.

    Paypal Fees: Cost of Goods Sold? Or Business Expense?

    ‘Netizens can, and do, argue this for hours on end: Are Paypal fees a “cost of goods sold?” Or are they simply an expense?

    To which I say: Meh, whatever. Either way, the fees get deducted from your small-biz revenue before you get to that place called “net profit.” Whether you classify them as COGS or as an expense, you end up with the same cash in your account.

    But there ARE a couple of scenarios to consider here which would affect how I treat my Paypal fees, accounting-wise.

    Paypal Fees on Products Bought for Resale

    If I, as a business owner, were paying Paypal fees when I bought products for resale, then I would consider those fees to be COGS. I’d account for them as such in Quickbooks, and direct them to a tax line for “Cost of Goods Sold: Other Costs” or something similar.

    Paypal Fees on Products You Sell

    On the other hand, if I as business owner were paying Paypal fees when customers bought product from me — and this is the situation I deal with on a day-to-day basis — then I would be pretty wishy-washy. These fees are realized at the time of sale, on every sale, since Paypal deducts them from my selling price when they deposit the sale revenue into my account. This makes them very much akin to a COGS.

    Despite this, I prefer to account for ALL my Paypal and Google Checkout fees as a business expense. To me, since they’re deducted from sales revenue, Paypal fees are just another form of the “merchant account fees” that brick-and-mortar retailers are so familiar with.

    My Way: Enter Paypal Fees With Each Transaction

    Because I like my Paypal register’s balance (in Quickbooks) to reflect what’s in my Paypal account at any given time, I enter all Paypal fees inside the sales receipt of the sales transactions they accompany.

    Why do I account for Paypal fees inside every sale transaction they affect? It’s because I reconcile my Paypal account the same way I reconcile every other bank or credit-card account, and I want to see each transaction show up in my Quickbooks register the same way it appears on my Paypal screen. For instance, if I sell a spreadsheet for $9.95, it appears as a credit of $9.36 in my Paypal account, with the $.59 fee already deducted.

    Thus, if I can account for the fee deduction on the same sales receipt that contains the sale itself, then my Quickbooks bank register will show the same credit of $9.36. And reconciling is a snap!

    Step 1: Set Up Your Paypal Account As a Bank Account.

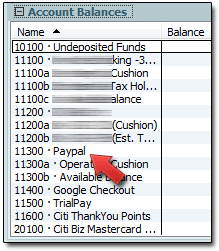
    That, at least, is how I treat my Paypal and Checkout accounts. They’re set up as bank accounts, just like my business checking and savings accounts are.

    When money moves either to or from my checking account from Paypal or Google, all it takes is a simple transfer in Quickbooks. (In the QB menubar, BANKING → TRANSFER FUNDS will get it done.)

    Step 2: Create OTHER CHARGE Items for Your Paypal Fees.

    Next you’ll want to set up an Other Charge item (or items, if you want to separate your fees into certain categories, as I do) to represent your Paypal fees. In the Quickbooks menubar, choose LISTS → ITEM LIST. then click the lower-left ITEM button, and choose NEW to get started creating a new Other Charge item. Here’s an example of how mine are set up:
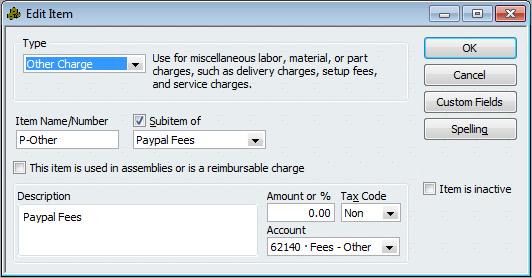
    Because I sell more than one type of spreadsheet — some are my creations, and some are created by others — I have more than one type of Paypal-fee item. This way, I can track how much I’m paying in fees for whichever spreadsheets I select.

    Step 3: Make Your Sales Receipt

    Probably the simplest way to explain this is to show you a sample sales receipt (pdf) that’s similar to what I generate.

    On that receipt, there are two items. The first, a Kafluder valve, is simply the Non-Inventory Item which the customer purchased. The second item is our Other Charge item, created above. It represents the Paypal fee of 59 cents which Paypal deducts from our sale transaction. Note that the Paypal item is entered as a negative, non-taxable amount.

    Alternate Way: Enter Paypal Fees Directly in Your Register

    In my method above, I enter the Paypal fees as an Other Charge item, and I do it inside the receipt which records the sale. Understandably, some folks prefer to have only the sale take place on the receipt. (Perhaps they send a copy of the receipt to the customer, and want it to reflect the total amount the customer actually paid.) These retailers can instead enter the Paypal fee straight into the Quickbooks register for their Paypal account.

    So, for a sample $19.95 sale to customer Joe Shmultzman (great family, the Shmultzmans), the Paypal fee of 88 cents would be entered as a transaction completely separate from the sale, and logged right in the Paypal account register itself:
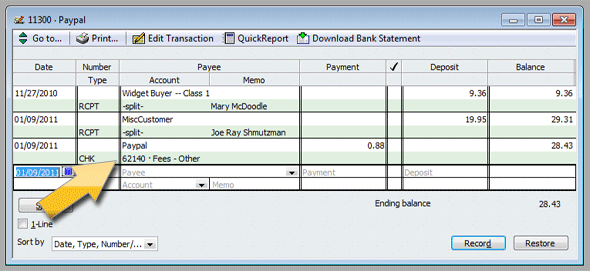
    The biggest problem with this method, to me, is that you’ll be entering a separate Paypal-fee transaction for every sale you make. That could tally up to a lot of “extra” transactions, if you sell much at all. PLUS you won’t see these transactions listed this way in your Paypal account when you view it online. And that can get a bit disorienting at reconcile time.

    Alternate, Alternate Way: Log Paypal Fees Once Per Month

    I know of some web retailers who log their Paypal fees only once per month. They do this at month’s end, or early the following month, using the Monthly Report which Paypal generates.
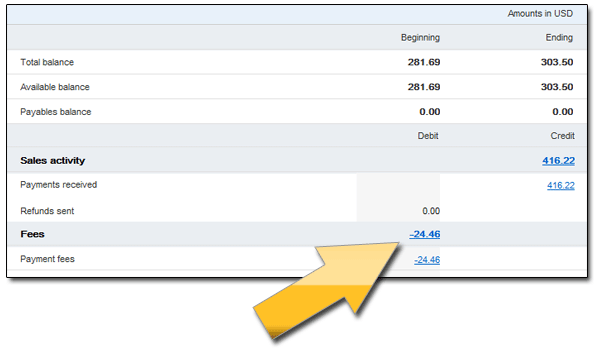
    After they run their “Monthly Report” in Paypal, they simply make a register entry for the total amount of fees deducted, expensing it to whatever account they wish.

    Personally, this method would never work for me. I check my actual Paypal balance against my Quickbooks Paypal register balance at least every day or two. When the two don’t match, I’m not a Happy Camper. Tracking fees this way would result in my online Paypal balance matching my Quickbooks Paypal balance ONLY at the end of the month.

    Sorry; no can do. I’d go nuts!