
Excel Receipt Splitter Spreadsheet
| Price: | Free! |
| File Type: | Excel Spreadsheet Template (.xlt) |
| File Size: | ~32kb (.zip) // ~64kb (.xlt) |
| Last Update: | 2008-01-30 |
| Current Version: | 3.0 |
| Macros: | Yes |

So now you understand the power of budgeting, and you're a big believer in categorizing your spending. Congrats! That's a huge step forward in getting a handle on your money!
Then it hits you: How the heck are you supposed to be able to categorize those huge receipts from your local superstore or warehouse club? It's not as if you buy just one category of stuff at those places. Groceries, household items, clothing — the list could go on forever. And your receipts could have a hundred separate products on there. How are you supposed to categorize that?
It's not that hard.
Really.
You just need a tool to help you. It's an Excel spreadsheet, and it's called the Receipt Splitter.
Step One: Grab your copy of the Receipt Splitter Spreadsheet ...

Step Two: Keep reading to see how much easier your budgeting life just became!
What Does "Splitting a Receipt" Mean?
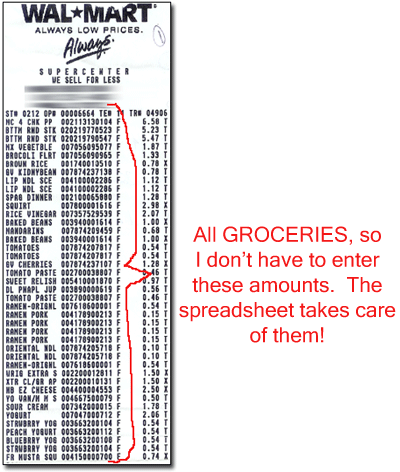
Well, perhaps it's easier to explain if I show you an actual receipt:
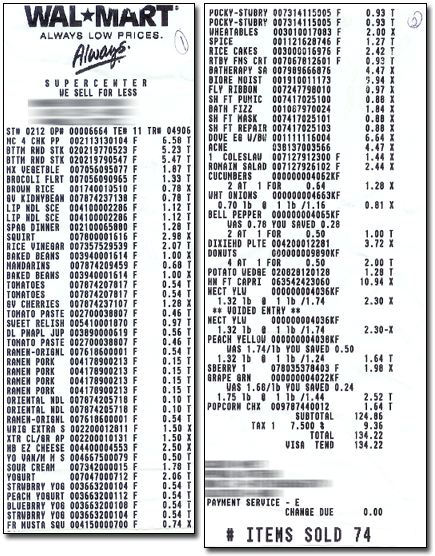
Wal-Mart's register counted a whopping 74 items on that receipt. If I'm interested in categorizing my spending here — and as a Quicken disciple, I certainly am — I can't just classify all $134.22 as "Food - Groceries" in Quicken. There's other stuff in there, right? Bath fizz, fly ribbon, Dixie plates, and more. Those things aren't food. In my budgeting system, they're "Household Consumables." And there are other categories of stuff on that receipt, too.
So the task I'm faced with now is rather yucky. I need to break that receipt down into my chosen spending categories.
If I were to tackle this by hand, it would, quite frankly, suck. Adding up all those products with pen and adding machine would take entirely too long.
A spreadsheet, however? With easily-totaled columns and rows? Now that has possibilities.
74 Down to 4
With my Receipt Splitter, in less than a minute, I've crunched those 74 items into 4 spending categories. Now this data is much more useful:
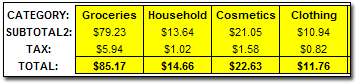
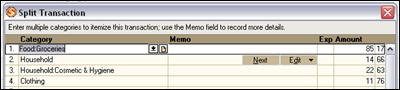
Two pages of consumer frenzy are now nicely grouped into four simple spending categories. And ready to enter, easy-peasy, into Quicken or whatever software program you're using.
And, most importantly, with those categories, I know exactly where my money's going.
Using the Receipt Splitter
It's entirely too easy. Really. Grab a receipt and try it!
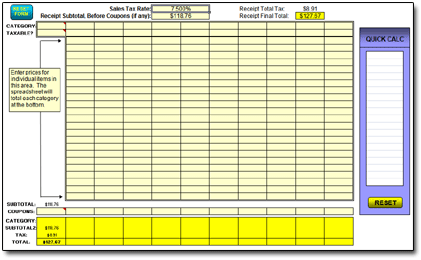
Step 1: Enter Your Local Tax Rate & Receipt Subtotal.
Find the subtotal of your receipt (before tax) and enter it at the top of the Receipt Splitter, with your local sales-tax rate just above:

For example, a state may collect a different rate of sales tax food than it does for other items.
If your state has different sales-tax rates for different categories of products, simply use the "Multiple Tax Rates" version of the Receipt Splitter and enter each category's sales-tax rate in Row 9.
Step 2: Determine the Category Most-Used on the Receipt.
Glance over your receipt. Which of your spending categories would have the most items on the receipt? That's the category you'll want to enter in the first CATEGORY cell:

In the case of my Wal-Mart receipt above [View], that category would be GROCERIES.
Why enter the most-used category here? Easy. Because the spreadsheet will completely tally up one category's items for you, so you might as well make it the most-used category! (In other words, let the spreadsheet take over the one category that would entail the most work for you!)
Step 3: Fill out the rest of the spreadsheet with your items' prices.
Enter the prices of any items that don't fall within the category you specified in Step 2 in the spreadsheet. Each category gets its own column, as shown here:
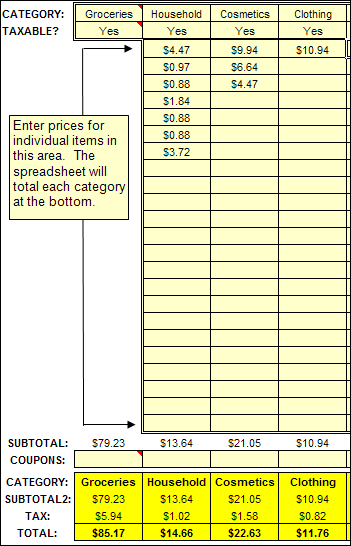
You have 11 columns to work with, so you can split your receipt into up to 11 categories.
A few things to consider:
- When entering prices, I go down the receipt item by item, ignoring any items that would fall into my Step 2 category (in this case, GROCERIES).
- Note that out of 74 items on the example Wal-Mart receipt, I only had to enter 11 of them in my spreadsheet. The other 63 items were GROCERIES, and the spreadsheet figured their total automatically!

- In the spreadsheet, you should only enter data in beige cells.
- Bright-yellow cells contain calculations or other important, non-changeable info.
Got Non-Taxable Items?
If you purchased any items that were non-taxable, they'll need their own column. In that particular column, to tell the Receipt Splitter to disregard sales tax, enter "No" in the row labeled TAXABLE.
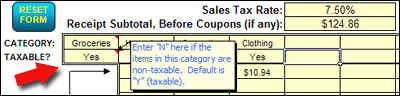
If all your items were non-taxable, simply enter "No" in the TAXABLE? cells in every column you use.
Handling Coupons
I'll be honest: Coupons can be tricky. Some places credit you for coupons before sales taxes are computed, and other places calculate coupon credits after sales tax has been computed. The Receipt Splitter spreadsheet assumes that coupons are applied before sales taxes are calculated.
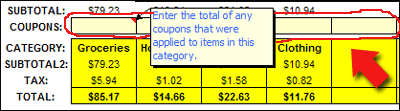
When you have coupons for items in any particular category, simply enter the coupons' total in the COUPONS row for that category. It's just above the bright yellow summary area at the bottom. If you need to total up some coupons, do it the easy way: Use the Quick Calc section on the right side of the spreadsheet!
Separating Sales Tax Paid
Personally, I don't separate out my sales tax into its own category. Some folks might wish to do this, though. If you're one of them, simply use the amounts in the yellow SUBTOTAL2 row as your category amounts, as tax won't be added to them yet. Your total sales tax for the receipt will show in the top right corner of the spreadsheet. (It's on your receipt, too, in case you're really lost.)
What's "Quick Calc" For?
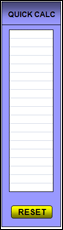
Use the "Quick Calc" section to add up any miscellaneous amounts as necessary. I'll use this if I need to total up some coupons, or perhaps a whole bunch of small amounts that I don't want to take up lots of space in the price-entry section.
when you're done with the Quick Calc section, or just want to clear it out, make sure macros are enabled in Excel and press the yellow RESET graphic at the bottom.
Making Sure It's Correct
If you've entered everything correctly, the final total on your receipt should match the total shown in the bright yellow "Receipt Final Total" box at the top right of your Receipt Splitter screen.
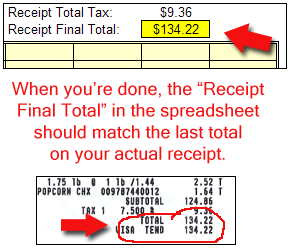
If they don't match exactly, I don't usually worry about it too much. I'll just recheck my coupon amounts (if any), and check for any taxable or non-taxable items that I might've forgotten to mark as such. If neither of these searches turns up anything, I simply adjust an item's price somewhere until my spreadsheet total and my receipt total match up.
Resetting the Receipt Splitter
Ready to move on to another receipt? It's one-click easy! Make sure macros are enabled in Excel, and simply click the CLEAR FORM button in the top left corner.
Saving the Receipt Splitter With Changes
A few readers have asked why they can't save the Receipt Splitter with, say, the tax rate already put in. The answer is: You can!
My Receipt Splitter is set up as an Excel template (.xlt) rather than as a standard Excel spreadsheet (.xls). When you double-click to open an Excel template, you're not really opening the template itself. Instead, Excel makes a duplicate of the template and opens that. (It would be tentatively titled "splitter1.xls" or something.) This way, you aren't making changes to the template itself; being a "template," it's there to be your never-changing starting point for the same task, each time. It'll be set up the same way, each time.
But suppose you do want your tax rate to already be included on the Receipt Splitter each time you open it. This is easy to pull off, once you know how to modify the template itself:
- Open the Receipt Splitter by right-clicking it, and selecting OPEN.
- Enter your sales-tax rate in the correct cell.
- SAVE the file.
- CLOSE the file.
Now, when you open the Receipt Splitter (by double-clicking, probably), your tax rate should already be filled in. You changed it in the template itself.
Questions? Comments? Contact Me!
Got a question or issue? Don't hesitate — drop me a line. I'll get back to you as soon as possible!

