

Use Tax in Quickbooks
![]() Let's face it: There's nothing tough about handling sales tax in Quickbooks. It's pretty straightforward.
Let's face it: There's nothing tough about handling sales tax in Quickbooks. It's pretty straightforward.
But what if your business has to pay use tax?
Ah, that's a different obstacle altogether, and there's no predefined way to handle it in Quickbooks. For this task, we're going to have to be a little creative. (And keep in mind that with use tax, as with so many accounting jobs, there's more than one way to make it work in Quickbooks.)
First, though, let's talk a bit about just what "use tax" really is.
Use Tax? What the Heck is That?
(If you already know, just skip to here.)
Every consumer and business owner knows what sales tax is — we all pay it when we purchase goods and (sometimes) services. It's one of the biggest ways that our cities, counties, and states scrounge up revenue for important things like road improvements, basic infrastructure, and of course, your mayor's hairpieces.
But a whole lot of folks have never heard of "use tax." (My mother-in-law ranking high among them.) And not every state assesses it; check your State Treasurer's or Tax Commissioner's website to find out.
But mine (Oklahoma) sure as heck does. And darn it, they want their use taxes paid as the same time as when sales taxes are due each month.
As per law, all Oklahomans are required to pay use tax — consumers, businesses, and all — but it's the businesses that the tax collectors watch most closely. So if you're a small-business owner, and your state collects use tax, you really do need to be careful.
Also, if an in-state vendor didn't collect sales tax on something you purchased, but should have, you're liable for paying the use tax on that product.
Wikipedia: Use Tax
Consider the internet: If I purchase a book or two from Amazon.com, since I live in Oklahoma, Amazon.com (based in Washington state) won't collect sales tax on the purchase. Nice savings for me, right? Wrong.
Oklahoma assesses use tax on such items. By law, I'm required to pay Oklahoma use tax on any items I purchase outside Oklahoma which are then used inside Oklahoma. Whether I purchased the item as a normal consumer (something for my home stereo from Crutchfield.com, perhaps) or as a small business (accounting software from Amazon.com) is irrelevent. Both entities — consumer and business — are required to pay use tax if no sales tax was charged at the time of purchase.
You think Oklahoma is going to miss out on all that sales-tax revenue just because a silly thing like the internet evolved? Heck no.
That's why "use taxes" were implemented. (They were around long before the internet, incidentally. But internet shopping has really brought use taxes to the forefront.)
Quickbooks and Use Tax
As noted before, Quickbooks makes (relatively) easy work of collecting, tracking, and remitting sales-tax revenues. But it has no inherent, direct way to handle use tax. Consider the following scenario:
As small-web-business owner, I decide to purchase a "how to run a blog" book for my blog, Money Musings. So I purchase my book from Amazon.com. Amazon doesn't charge any sales tax on my purchase. Because of that, though, I will owe use tax (payable to the State of Oklahoma) on the purchase. In Oklahoma, the use tax rate is the same as the current sales-tax rate: 7.5 percent.
My book from Amazon costs me $9.60, which I charge to my business credit card. Now I have to find a way to account for the 72 cents (.075 x 9.60) of use/sales tax I need to remit to the state.
Goal: We want Quickbooks to correctly calculate the Use Tax, and post it to our Sales Tax Payable account just as it would for any standard Sales Tax we collected. We also want Quickbooks to show the amount due in our sales-tax vendor's account, as it would for any standard Sales Tax we collected. Finally, we want to avoid having to run any special reports or make sales-tax adjustments at the time taxes are remitted.
There are several ways to make this happen; here's how I do it.
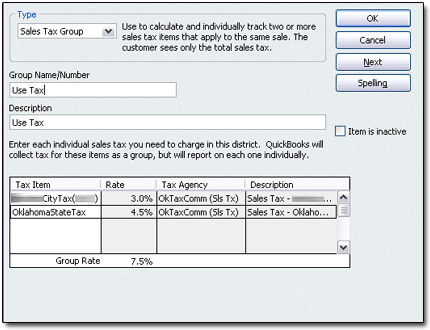
In my case, since the use tax rate is the same as the sales tax rate, this isn't absolutely necessary. But if your use tax rate differs from your sales tax rate, you'll need to create a new Sales Tax Item. Name it something wacky and creative, like "Use Tax." Set it up with the correct tax rate(s) and tax agency.
Since my city also collects sales/use tax, my "Use Tax" Item is actually a Sales Tax Group. It includes the Sales Tax Item for my city as well as the Sales Tax Item for my state.
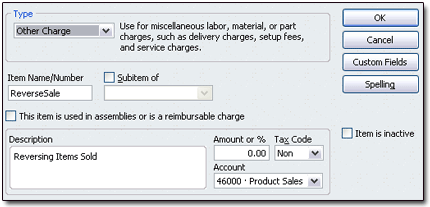
Next, create a new Other Charge Item. Call it "ReverseSale" or whatever. Make it Non-Taxable. Set its linked account as an Income Account of some sort. But remember the account you're linking it to; you'll need it again in a moment.
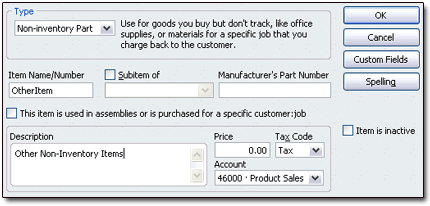
Our next step is to create a new Non-Inventory Part Item; I chose to call mine simply "OtherItem." Set it up as Taxable. Link it to the same Income Account as the "ReverseSale" Other Charge Item from the previous step.
Make an Other Charge Item called "UseTaxExp." (Or whatever you like.) Make it Non-Taxable. Link it to an Expense account; I created a separate one called "Use Tax Expense" to track these expenditures.

You probably already have one, but if not, create a Subtotal Item.
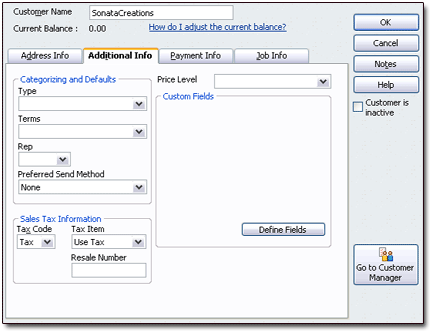
Head over to your Customer List and, if you haven't already, add your business as its own Customer. In the Additional Info tab, set the business as Taxable. For the default Tax Item, select the "Use Tax" Sales Tax Item or Group you created above.
That should be all of the Items, Other Charges, and Customers that we need to create. Now we'll put it all together on an Invoice (or Sales Receipt) and get our use tax handled nicely.
Open a new Sales Receipt or Invoice, choosing your business as the Customer.
- Using your "OtherItem" Item, add each of the items you purchased. Enter the price you paid for each.
- Once you've entered all your purchases, on the next line, use a Subtotal Item to get the total so far.
- Use the "ReverseSale" Item on the next line. Enter the subtotalled amount above as a negative amount.
- On the next line, use your "UseTaxExp" Item. Check the amount of calculated tax at the bottom of the Receipt/Invoice. Enter that amount here as a negative amount.
At this point, the final Receipt or Invoice total should be zero. Given my book-purchase scenario above, here's how my Sales Receipt would look:
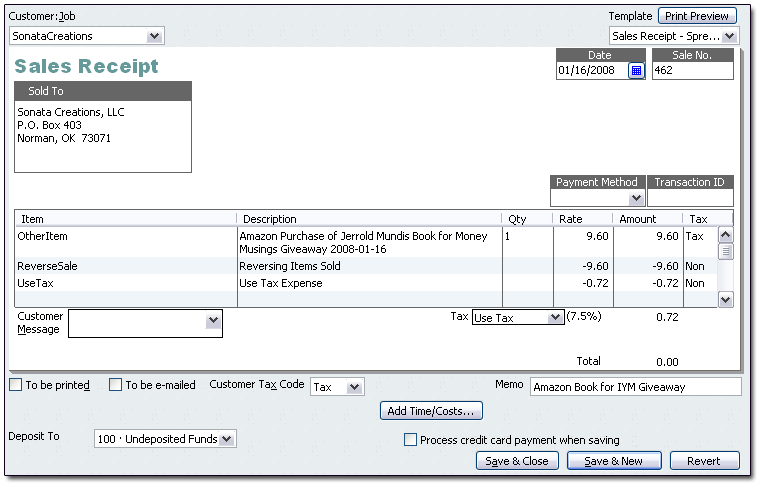
Note that I didn't use a Subtotal Item since I purchased only one thing (the book).
For my business, the accounting breakdown would look like this:
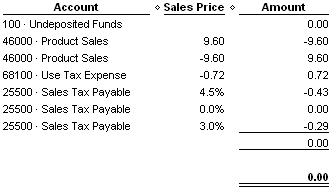
That's it! Quickbooks will now set aside the correct amount of use tax in our sales-tax payable account, and that amount will be charged to whatever Expense account we use for use-tax expenditures.
As can be seen from the accounting summary above, our Sales account isn't affected (on a net basis, at least) by the Receipt. I elected to deposit the Receipt proceeds to my Undeposited Funds account, but the net effect there is (again) zero.
That's exactly what we want. 